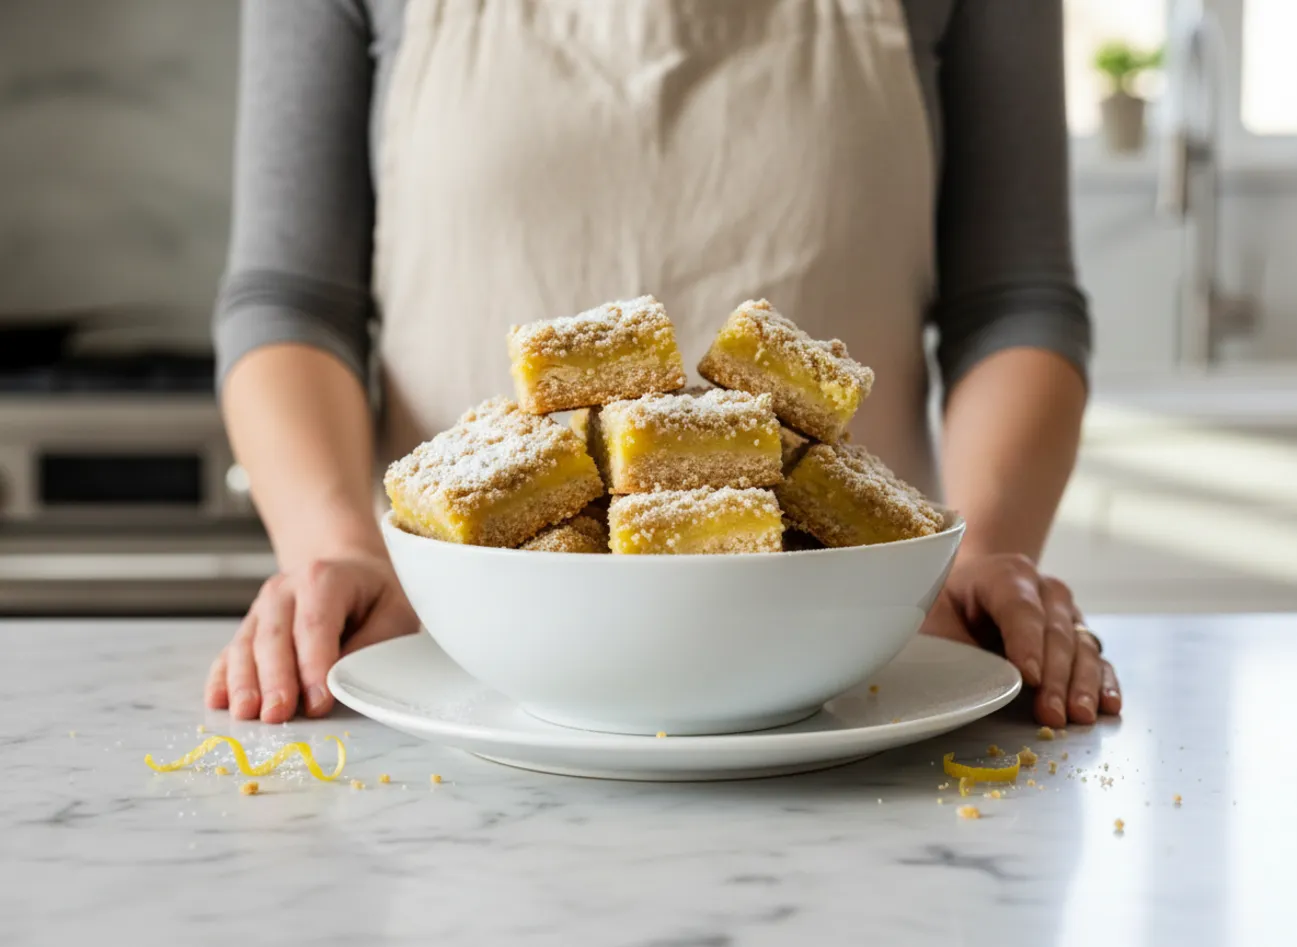
Some of my favorite memories are tied to the scent of citrus. Specifically, the bright, zesty smell of lemons filling my grandmother’s kitchen on a sunny afternoon. She had a way of turning simple ingredients into something magical, a skill I’ve always tried to carry with me. These Lemon Crumb Bars are a direct nod to those days—a dessert that tastes like sunshine and nostalgia. They have the perfect balance of a tangy lemon filling and a buttery, sweet crumb topping that melts in your mouth.
My passion for cooking began in my grandmother’s kitchen, where I learned that great food is about connection, not just ingredients. I create home-style recipes that blend tradition with modern simplicity. Whether you’re a busy parent or a beginner, my goal is to make cooking approachable and joyful. Every recipe here is rigorously tested to ensure it brings the comfort of a home-cooked meal to your table, seasoned with a little nostalgia and a lot of love. These simple Lemon Crumb Bars are a perfect example of that philosophy. They are incredibly easy to make and are always a hit, making them one of my favorite holiday dessert recipes to share.
What makes these particular Lemon Crumb Bars so special is their simplicity. You only need five common ingredients to create a dessert that looks and tastes like it came from a high-end bakery. The shortbread crust doubles as the crumb topping, which saves you time and effort without sacrificing any of the buttery goodness. If you’ve been searching for a go-to treat, this is it.
Why You’ll Love These Lemon Crumb Bars
These bars are a delightful treat for so many reasons. First, they are incredibly straightforward. The recipe uses the same mixture for both the base and the topping, which seriously cuts down on prep time and dishes. Additionally, the flavor is spectacular. The bright, tangy lemon filling cuts through the richness of the buttery crumb, creating a perfectly balanced bite every single time. They are sweet, but not overwhelmingly so.
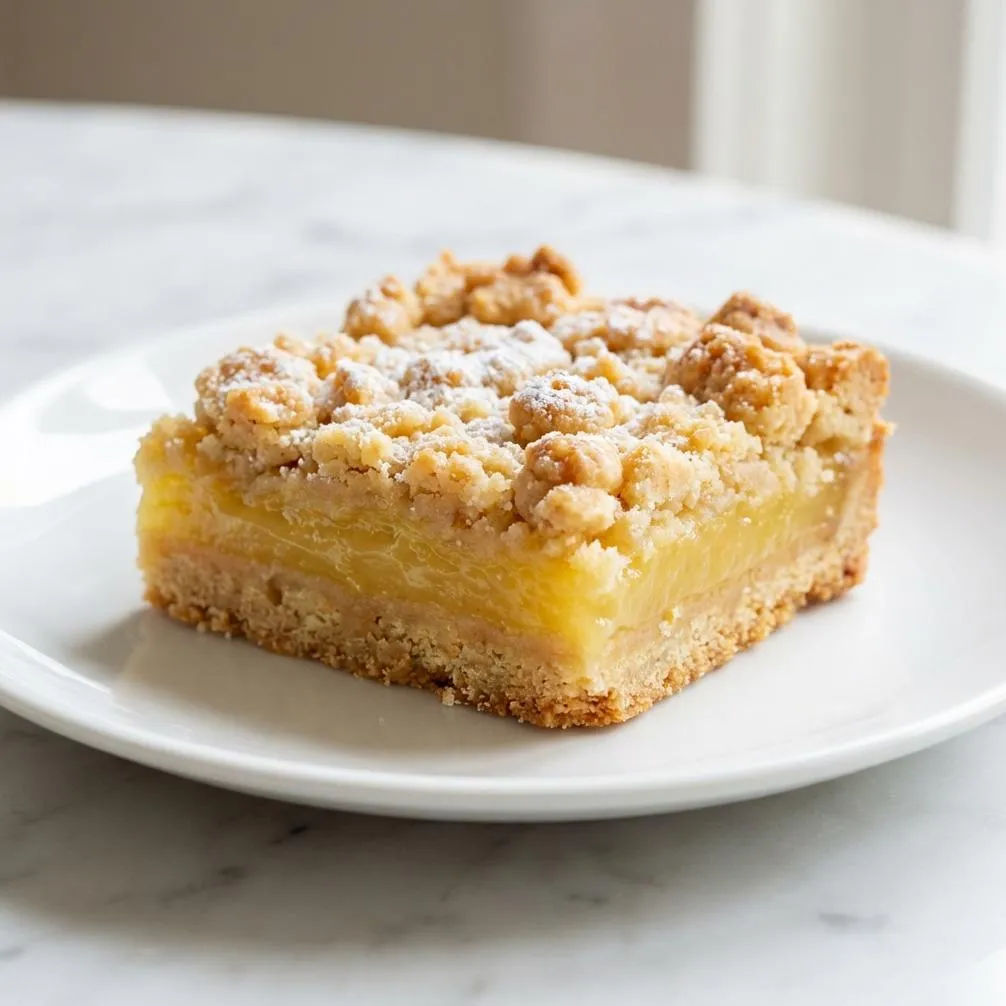
Another great thing about these bars is their texture. The shortbread crust is firm yet tender, providing a solid foundation for the gooey lemon layer. Then, the crumbly topping adds a wonderful crunch that contrasts beautifully with the soft filling. They hold their shape well after cooling, making them ideal for packing in lunches, bringing to potlucks, or serving at parties. They look impressive but are secretly one of the easiest desserts you can make.
The Magic of a Dual-Purpose Crumb
The genius of this recipe lies in the crumb mixture. Instead of making a separate crust and topping, you create one simple buttery dough. You’ll press about two-thirds of it into the bottom of your baking pan to form a sturdy shortbread base. Afterward, you sprinkle the remaining third over the lemon filling. This technique not only makes the process faster but also gives the bars a cohesive flavor and texture from top to bottom. The base bakes into a firm, cookie-like crust, while the topping becomes golden and crumbly.
Choosing Your Lemons
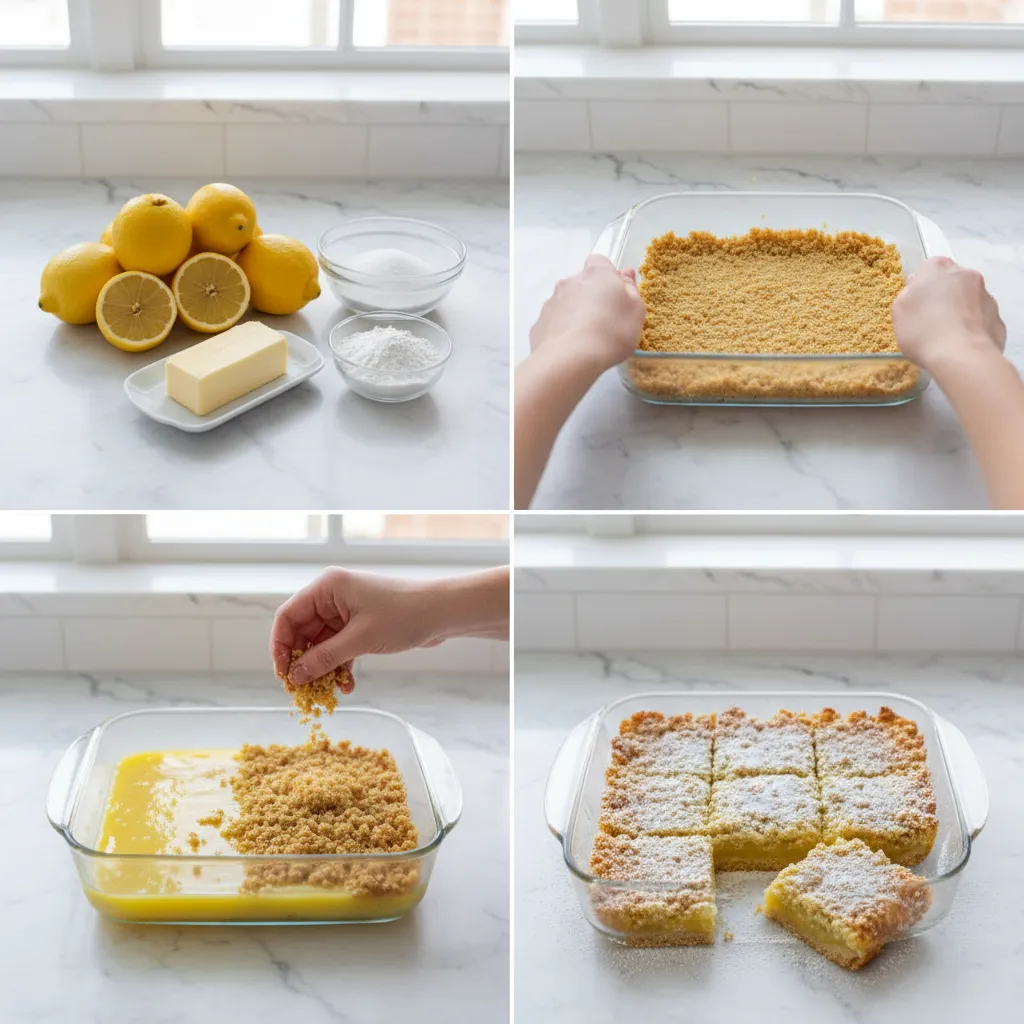
For the best flavor, always use fresh lemons. While bottled lemon juice can work in a pinch, the taste from freshly squeezed lemons is brighter and more complex. You’ll want lemons that are firm, heavy for their size, and have a vibrant yellow peel. Before juicing, be sure to zest one of the lemons. The zest contains essential oils that add an intense citrus aroma and taste to the filling that you just can’t get from juice alone. This small step makes a huge difference in the final product.
Perfecting Your Crumb Bar Technique
Making these bars is simple, but a few key tips will help you get bakery-quality results every time. Attention to detail, especially when it comes to the crust and filling, will give you the best possible texture and taste. From preparing the pan to getting that perfect golden-brown topping, following these suggestions will make your bars stand out.
The goal is a bar that is soft and zesty in the middle, with a buttery, slightly crisp foundation and topping. It sounds fancy, but the process is surprisingly forgiving. Just remember that baking is as much about technique as it is about the ingredients themselves.
Getting the Crust Just Right
The foundation of any great bar is its crust. For this recipe, you want a shortbread base that is buttery and firm enough to hold the filling without becoming tough. The key is to avoid overworking the dough. Mix the flour, sugar, and butter just until it resembles coarse crumbs. If you overmix, the gluten in the flour will develop too much, resulting in a hard crust. When pressing the dough into the pan, apply gentle, even pressure to create a uniform layer. This helps it bake evenly and prevents parts of it from becoming too dark.
Achieving a Smooth Lemon Filling
The lemon filling should be smooth, creamy, and vibrantly tangy. To get this consistency, make sure you whisk the egg, sugar, lemon juice, and zest together thoroughly until the mixture is completely smooth and slightly pale. This dissolves the sugar and incorporates air, which gives the filling a lighter texture. Pour the filling over the pre-baked crust while the crust is still warm. This helps the filling set properly and bond with the base, preventing a soggy bottom.
A Simple Lemon Crumb Bar Recipe
This Lemon Crumb Bar Recipe is designed for simplicity. It’s a fantastic choice for beginner bakers or anyone who wants a delicious dessert without a lot of fuss. The crumb topping is made from a simple mixture of flour, sugar, and butter, which creates a texture similar to some traditional baked goods like the oat-based British flapjack, though this version is lighter and without oats. The real star, however, is the zesty lemon filling that brings everything together.
Follow the steps carefully, and you’ll have a batch of irresistible bars ready in no time. The most difficult part is waiting for them to cool completely before slicing—a crucial step for clean, beautiful squares.
Assembling Your Bars
Start by preheating your oven and preparing an 8×8 inch baking pan. Lining the pan with parchment paper, leaving an overhang on two sides, is a game-changer. This creates “handles” that let you lift the entire block of bars out of the pan easily once they have cooled. After you prepare the crumb mixture, firmly press about two-thirds of it into the bottom of the pan. Bake this crust for about 15 minutes until it is lightly golden. This pre-baking step is critical for preventing a soggy bottom.
Baking to Golden Perfection
Once the crust is pre-baked, pour the lemon filling over the top and spread it into an even layer. Sprinkle the remaining crumb mixture evenly over the filling. Don’t press it down; just let it sit loosely on top. This allows the topping to get nice and crispy. Bake the bars until the filling is set and the crumb topping is a beautiful golden brown. You’ll know they’re done when the center doesn’t jiggle when you gently shake the pan.
Storing and Serving Your Zesty Bars
Once your Lemon Crumb Bars are baked, the waiting game begins. You must let them cool completely at room temperature before you even think about slicing them. If you try to cut them while they are still warm, the filling will ooze out, and you’ll have a delicious mess instead of neat squares. For even cleaner cuts, you can chill the cooled bars in the refrigerator for about 30 minutes before slicing.
These bars are fantastic on their own, but a light dusting of powdered sugar right before serving adds a touch of elegance and an extra hint of sweetness. They are a wonderful afternoon snack with a cup of tea or a simple but impressive dessert for guests.
How to Store Leftovers
If you have any leftovers, you can store them in an airtight container. They will keep at room temperature for up to two days, but I prefer to store them in the refrigerator. Chilling the bars keeps the filling firm and the crust crisp. They will last in the fridge for up to a week. When you’re ready to eat one, you can enjoy it cold straight from the fridge or let it sit out for a few minutes to come to room temperature.
Can You Freeze Lemon Bars?
Yes, these bars freeze beautifully! To freeze them, let them cool completely, then slice them into individual squares. Wrap each square tightly in plastic wrap, then place them in a freezer-safe bag or container. They can be frozen for up to three months. When you’re ready for a treat, simply thaw them in the refrigerator or on the countertop. They taste just as fresh as the day you made them, making this a great make-ahead dessert.
5-Ingredient Lemon Crumb Bars
5-Ingredient Lemon Crumb Bars
Ingredients
- 1 cup unsalted butter softened
- 2 cups all-purpose flour
- 0.5 cup granulated sugar
- 1 large egg
- 1 can sweetened condensed milk 14 ounces
- 0.5 cup fresh lemon juice from about 2-3 lemons
- 1 tablespoon lemon zest
Instructions
- Preheat oven to 350°F (175°C). Line an 8×8-inch baking pan with parchment paper, leaving an overhang on two sides.
- In a medium bowl, combine softened butter, flour, and sugar. Use a pastry blender or your fingers to form coarse crumbs.
- Measure out 1 ½ cups of the crumb mixture and press evenly into the bottom of the prepared pan.
- Bake the crust for 15 minutes, until edges are lightly golden.
- While the crust bakes, whisk together sweetened condensed milk, egg, lemon juice, and lemon zest until smooth.
- Pour the lemon filling over the warm crust. Sprinkle the remaining crumb mixture evenly on top.
- Bake for 25-30 minutes, until the filling is set and topping is golden brown.
- Cool completely on a wire rack for at least 1 hour. Chill an additional 30 minutes for best results.
- Use the parchment paper handles to lift the bars out of the pan. Slice into 16 squares and serve.
Notes
Frequently Asked Questions
How do I know when lemon crumb bars are done?
The bars are done when the lemon filling is set and no longer jiggles in the center when you gently shake the pan. The crumb topping should also be a light golden brown.
Can I use bottled lemon juice for lemon crumb bars?
You can, but fresh lemon juice provides a much brighter and more authentic citrus flavor. If you do use bottled juice, you will miss out on the lemon zest, which adds a significant amount of aroma and taste.
How do I store lemon crumb bars?
Store them in an airtight container at room temperature for up to 2 days or in the refrigerator for up to a week. I recommend refrigeration to keep the filling firm.
Why is my shortbread crust hard?
A hard crust is usually caused by overworking the dough. When you mix the flour, sugar, and butter, stop as soon as it forms coarse crumbs. Overmixing develops the gluten in the flour, which results in a tough, hard base instead of a tender, crumbly one.
A Perfect Treat for Any Occasion
These Lemon Crumb Bars are truly a joy to make and eat. They prove that you don’t need a long list of complicated ingredients to create a dessert that is both comforting and impressive. The combination of the tangy lemon filling with the buttery shortbread crumb is a classic for a reason. I hope this simple Lemon Crumb Bar Recipe brings a little bit of sunshine into your kitchen, just like it does in mine. Enjoy every zesty bite