Some smells instantly transport you back in time. For me, it’s the rich aroma of a slow-cooking brisket that sends me straight to my grandmother’s bustling kitchen. She had this old, heavy Dutch oven that seemed to hold generations of flavor within its seasoned walls. Watching her prepare her famous tender braised beef brisket was a lesson in patience and love. She taught me that the magic wasn’t in fancy techniques but in giving good ingredients the time they need to shine. That feeling of anticipation, the way the whole house filled with a comforting scent, is something I’ve carried with me my whole life.
This recipe proves that you don’t need to be a professional chef to produce a meal that tastes like a five-star dish. The secret lies in a few key steps that transform a tough cut of meat into a fork-tender masterpiece. We will walk through everything you need to know to create the most incredible tender braised beef brisket your family has ever tasted. Get ready for a meal that’s perfect for a Sunday dinner, a special occasion, or any day you crave pure comfort food.
Tip 1: Choosing the Perfect Cut for Tender Braised Beef Brisket
The foundation of any great brisket dish is, without a doubt, the meat itself. Walking up to the butcher counter can feel a little intimidating with all the different cuts available. However, for a tender braised beef brisket, you have a specific goal in mind.
Understanding the Brisket Cut
A whole brisket consists of two main muscles: the “point” and the “flat.” The point is the fattier, more marbled part, while the flat is leaner. For braising, I strongly recommend using the “first cut” or the flat. While the point is fantastic for smoking, the flat holds its shape better during a long, slow cook in liquid, resulting in beautiful, tender slices. Look for a cut that has a consistent thickness and a nice, even fat cap on top, about a quarter-inch thick. This fat is crucial because it will melt during cooking, basting the meat and adding immense flavor and moisture.
What to Ask Your Butcher
Don’t be shy about talking to your butcher. Ask for a 3-4 pound first-cut beef brisket. Specify that you plan to braise it, and they can point you to the perfect piece. A good piece will have a deep red color and feel firm to the touch. A quality cut of meat is the first step toward achieving that melt-in-your-mouth texture that makes this dish so memorable. The right selection sets the stage for a truly successful meal.
Tip 2: Building a Deep and Savory Flavor Base
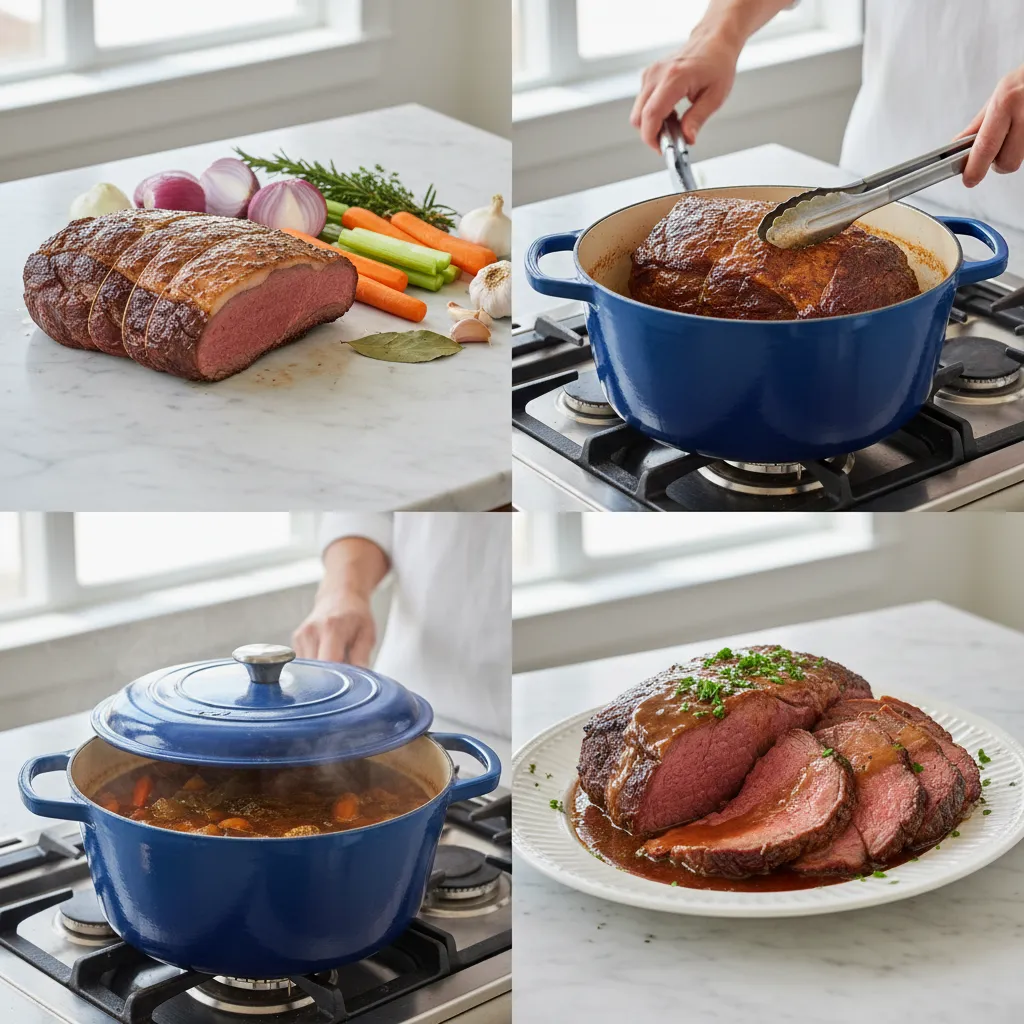
A truly unforgettable tender braised beef brisket gets its character from a rich, complex braising liquid. This isn’t just about adding water and letting it simmer; it’s about layering flavors methodically. The initial sear and the aromatic vegetables are just as important as the liquid itself.
The Importance of a Good Sear
First, you must sear the brisket. This step is non-negotiable. Pat the brisket completely dry with paper towels and season it generously on all sides with salt and pepper. Heating a little oil in a heavy-bottomed pot or Dutch oven over medium-high heat is the next step. Carefully place the brisket in the hot pot and sear it for 4-5 minutes per side, until a deep, brown crust forms. This crust, created by the Maillard reaction, builds the first layer of profound, savory flavor that will permeate the entire dish. Once seared, remove the brisket and set it aside.
Creating the Aromatic Foundation
Next, you build the foundation of your braising liquid in the same pot. Sauté your aromatic vegetables—onions, carrots, and celery—in the rendered beef fat until they soften and begin to caramelize. This process releases their natural sugars and adds another layer of sweetness and depth. Follow that with garlic and tomato paste, cooking them for just a minute until fragrant. The tomato paste adds a wonderful umami richness that complements the beef perfectly. These initial steps are what separate a good brisket from a great one.
Tip 3: Mastering the Slow-cooked beef brisket recipe Technique
Patience is the final, and perhaps most important, ingredient in this dish. Braising is a slow, moist-heat cooking method that breaks down tough connective tissues in the meat, turning them into gelatin. This process is what results in that incredibly tender texture we all crave.
The Low and Slow Simmer
After building your flavor base, it’s time to deglaze the pot with red wine and beef broth, scraping up all those browned bits from the bottom. Those bits are pure flavor. Return the seared brisket to the pot, making sure it’s mostly submerged in the liquid. Bring the mixture to a simmer on the stovetop, then cover it tightly and transfer it to a preheated oven. Cooking it in the oven provides a consistent, gentle heat that surrounds the pot, which is ideal for this slow-cooked beef brisket recipe. The target temperature is low, around 325°F (163°C).
Letting Time Do the Work
Now, you just let it be. The brisket will need to cook for about 3 to 4 hours. You can check it after the 3-hour mark by inserting a fork; if it slides in and out with little resistance, it’s ready. Rushing this process is the biggest mistake you can make. The meat needs this extended time for the collagen to fully break down. This is the essence of a great brisket recipe. Once cooked, let the brisket rest in its liquid for at least 20 minutes before slicing. This allows the juices to redistribute, guaranteeing a moist and flavorful result. This slow-cooked beef brisket recipe is all about letting the process work its magic.
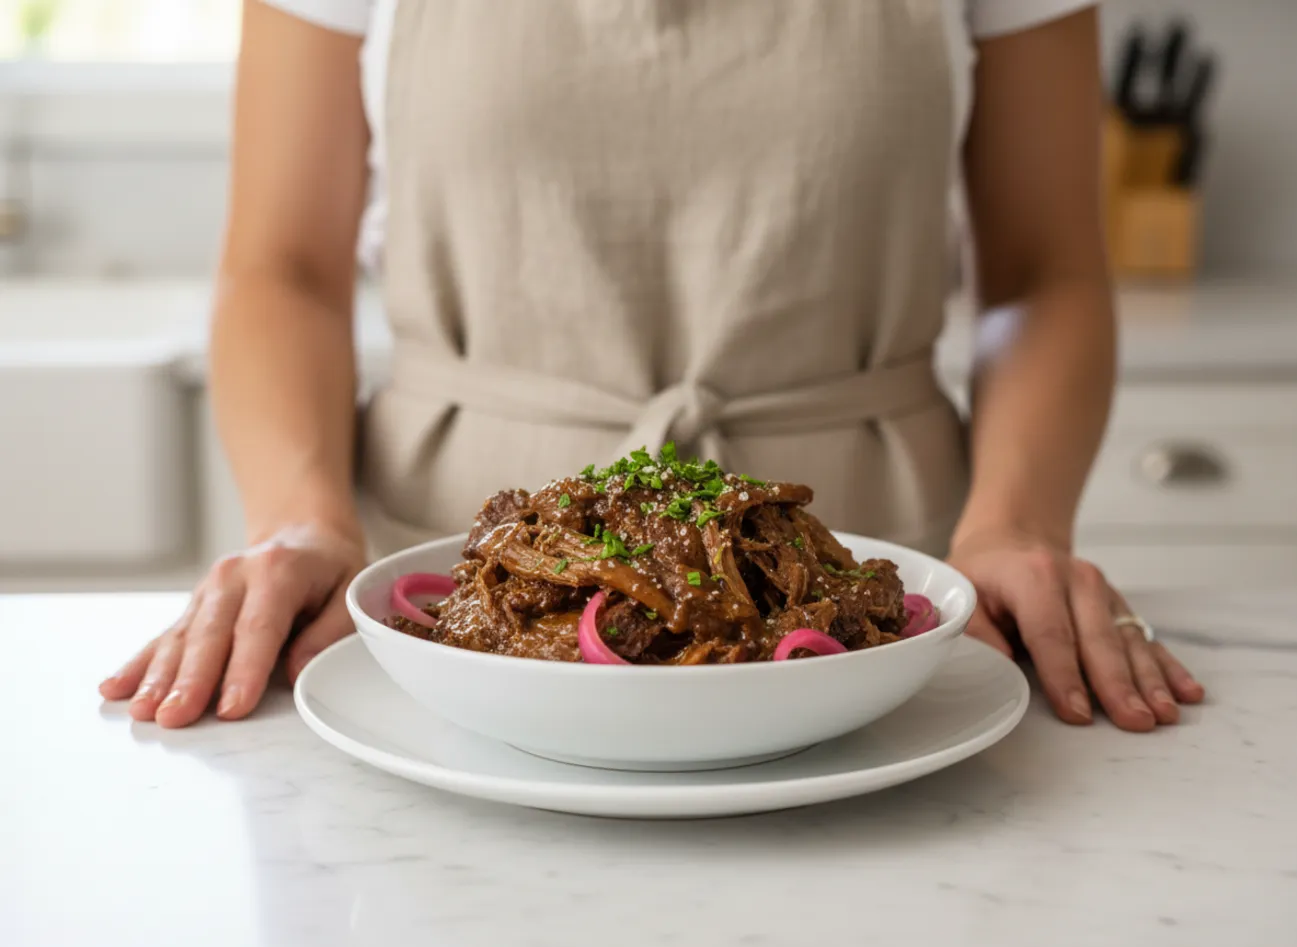
Serving and Storing Your Beef Brisket
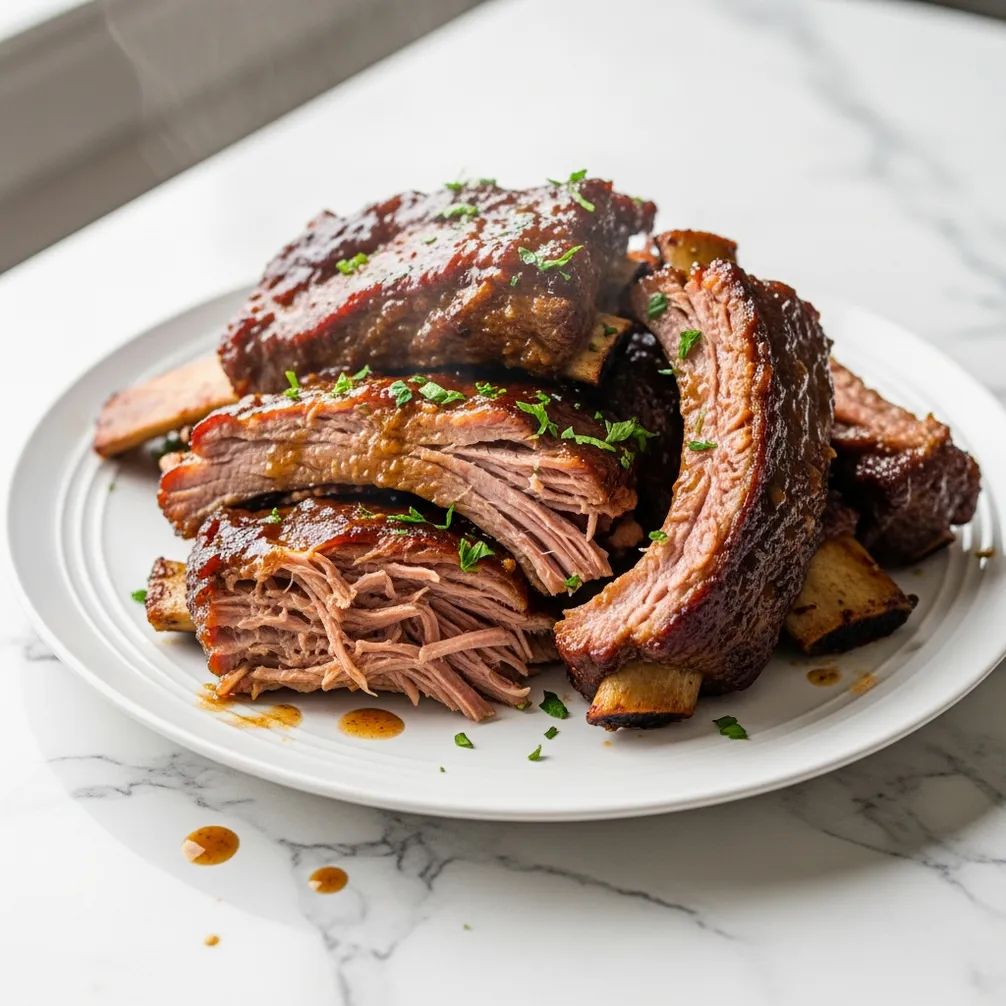
Once your tender braised beef brisket is perfectly cooked and rested, it’s time for the final presentation. Proper slicing and thoughtful side dishes will complete this comforting meal.
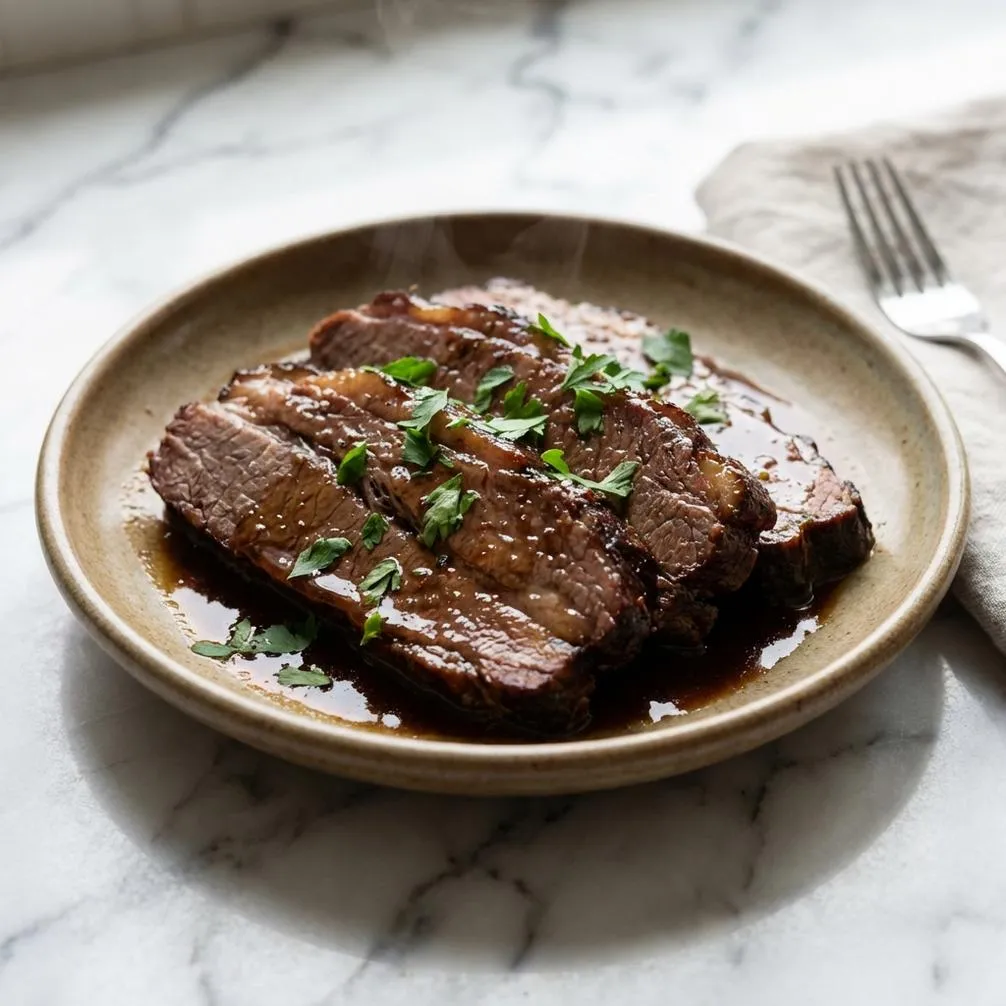
How to Slice and Serve
Always slice brisket against the grain. Look for the lines of the muscle fibers running through the meat and cut perpendicular to them. This simple action shortens the muscle fibers, making each slice much more tender to eat. I recommend slicing it about a quarter-inch thick. Arrange the slices on a platter and spoon some of the rich, flavorful braising liquid over the top to keep it moist and delicious.
Perfect Pairings and Storage
This brisket pairs wonderfully with creamy mashed potatoes, egg noodles, or roasted root vegetables. The sauce from the pot is liquid gold, so be sure to serve plenty of it. While this dish is a star, for a quicker weeknight comfort meal, you might also love this creamy pesto chicken pasta bake. If you have leftovers, they are fantastic. Store the sliced brisket in its cooking liquid in an airtight container in the refrigerator for up to 4 days. The flavor actually deepens overnight, making it even better the next day.
Tender Braised Beef Brisket
Tender Braised Beef Brisket
Ingredients
Brisket
- 3-4 lb beef brisket first cut (flat), trimmed with 1/4-inch fat cap
- 2 tsp kosher salt
- 1 tsp black pepper
- 2 tbsp olive oil
Vegetables
- 2 large yellow onions chopped
- 3 large carrots chopped
- 3 stalks celery chopped
- 4 cloves garlic minced
Braising Liquid
- 2 tbsp tomato paste
- 1 cup dry red wine Cabernet Sauvignon or Merlot
- 4 cups beef broth
- 2 bay leaves
- 1 tsp dried thyme
Instructions
- Preheat oven to 325°F (163°C). Pat the brisket dry with paper towels and season all sides with kosher salt and black pepper.
- Heat olive oil in a large Dutch oven over medium-high heat. Sear the brisket fat-side down for 4–5 minutes until a deep brown crust forms. Flip and sear the other side for another 4–5 minutes. Remove and set aside.
- Reduce heat to medium. Add onions, carrots, and celery to the pot and cook for 8–10 minutes until softened and lightly browned.
- Add minced garlic and tomato paste. Cook for 1 minute, stirring constantly until fragrant.
- Pour in the red wine to deglaze the pot, scraping up browned bits from the bottom. Let the wine simmer and reduce by about half, about 3–4 minutes.
- Stir in beef broth, bay leaves, and dried thyme. Return the brisket to the pot fat-side up. The liquid should come about halfway up the sides of the meat. Bring to a gentle simmer.
- Cover with a tight-fitting lid and transfer to the oven. Braise for 3 to 3½ hours until the brisket is fork-tender.
- Remove from the oven and let the brisket rest in the braising liquid for at least 20 minutes. Transfer to a cutting board and slice against the grain into 1/4-inch slices.
- Strain the braising liquid if desired and skim off excess fat. Serve the sliced brisket topped with the rich sauce.
Notes
Frequently Asked Questions
What is the best cut of brisket for braising?
For braising, the best cut is the “first cut” or the “flat.” It is leaner than the point cut and holds its shape well during the long cooking process, which makes it ideal for slicing. Look for one with an even fat cap of about a quarter-inch to keep the meat moist.
Can I make braised beef brisket ahead of time?
Absolutely. In fact, many people find that the flavor improves after a day in the refrigerator. Simply cook the recipe as directed, let it cool completely in the braising liquid, and store it in an airtight container. Reheat it gently on the stovetop or in the oven.
Why is my braised brisket tough?
Tough brisket is usually the result of undercooking. The braising process breaks down the tough connective tissue (collagen) into gelatin, which makes the meat tender. If it’s still tough, it likely needs more time in the oven. Cover it and continue cooking, checking for tenderness every 30 minutes.
What should I serve with beef brisket?
Tender braised beef brisket pairs well with a variety of classic comfort food sides. Creamy mashed potatoes, buttered egg noodles, or a simple polenta are excellent choices for soaking up the delicious sauce. Roasted vegetables like carrots, parsnips, and Brussels sprouts also make a wonderful accompaniment.
Conclusion
Creating a truly memorable tender braised beef brisket is a rewarding experience that fills your home with incredible aromas and your table with a comforting, delicious meal. By selecting the right cut, building a deep flavor base, and embracing the low-and-slow cooking process, you can achieve perfect, fork-tender results every time. This recipe is more than just food; it’s a way to slow down, connect with tradition, and share a little bit of love, one delicious slice at a time. I hope it becomes a cherished favorite in your home, just as it is in mine.