Some of my most cherished memories are wrapped in the warm, buttery scent of my grandmother’s kitchen. She would pull a golden-brown brioche loaf from the oven, and the whole house would feel like a hug. When I had to switch to a gluten-free lifestyle, I thought those days were over. The store-bought options were often dense and disappointing, a pale comparison to the real thing. It took time, but I was determined to recreate that magic. This gluten free brioche is the result of that determination—a bread that is soft, rich, and full of that nostalgic flavor I missed so much. It proves that with the right approach, you can still enjoy your favorite comforts.
This gluten free brioche is a perfect example of that philosophy. While this bread is a fantastic sweet treat, sometimes you might crave something savory. For another wonderful gluten-free baking project, you might enjoy this high-protein quiche.
I’m so excited to share this recipe with you. It brings back the joy of real, pillowy bread without any gluten. Let’s get baking!
The Secrets to a Perfect Gluten Free Brioche
Brioche is a type of bread that originates from France, famous for its incredibly rich and tender crumb. The secret lies in its high content of eggs and butter, which gives it a texture that’s almost like a pastry. When you decide to make a gluten free brioche, the main challenge is replicating that signature softness without the gluten protein structure that typically holds bread together.
Gluten provides elasticity and traps the gasses released by yeast, which makes conventional bread rise and gives it a chewy texture. Without it, breads can turn out crumbly and dense. Therefore, a successful gluten free brioche relies on a careful combination of alternative flours and binders to mimic that effect and create a light, airy loaf.
Why Butter and Eggs are Crucial
In any brioche recipe, butter and eggs are the stars of the show. The fat from the butter coats the flour particles, which shortens the gluten strands in traditional bread, leading to a softer crumb. In our gluten-free version, the butter still serves this purpose, adding immense flavor and moisture that is essential for a good texture.
Eggs contribute fat, flavor, and structure. The proteins in the eggs help bind the ingredients and provide some of the lift that we lose without gluten. They also give the brioche its characteristic yellow color and rich taste. For this recipe, using room-temperature eggs and butter is very important, as it helps them incorporate smoothly into the dough.
Choosing the Right Gluten-Free Flour Blend
Not all gluten-free flour blends are created equal, especially when it comes to bread. For this gluten free brioche recipe, you need a high-quality “cup-for-cup” or “measure-for-measure” blend that contains xanthan gum. Xanthan gum is a binder that acts as a substitute for gluten, providing the elasticity and stickiness needed to trap air and give the bread structure.
Look for a blend that contains a mix of lighter starches (like tapioca starch, cornstarch, or potato starch) and whole-grain flours (like brown rice flour or sorghum flour). This combination typically yields the best balance of flavor and texture. Avoid heavy flours like bean flour, which can give the bread an undesirable taste and density.
Preparing Your Fluffy Brioche Dough
Making gluten-free dough is a different experience from working with traditional wheat dough. It’s often much stickier and behaves more like a thick batter than a pliable dough you can knead by hand. Because of this, using a stand mixer is highly recommended. It does the hard work of developing the dough’s structure by beating air into the mixture.
The goal is to create a smooth, homogenous mixture where the fats and liquids are fully incorporated. This process builds the foundation for a soft and well-risen loaf. Be patient during this stage; proper mixing is one of the keys to success with any gluten free brioche recipe.
Getting the Yeast Started
The first step in many bread recipes is activating the yeast, and it’s a critical one. This process, also known as “proofing” the yeast, confirms that your yeast is alive and ready to work. To do this, you’ll combine the yeast with warm milk and a little sugar. The milk should be warm to the touch but not hot—around 105-115°F (40-46°C) is ideal. If it’s too hot, it will kill the yeast.
After about 5 to 10 minutes, the mixture should become foamy or bubbly on top. This foam is a sign that the yeast is active and will be able to make your brioche rise. If you don’t see any activity, your yeast may be old, and you should start over with a fresh packet.
The Role of a Stand Mixer
A stand mixer fitted with a paddle attachment is your best friend for this recipe. Because gluten-free dough lacks the protein network that you develop through kneading, you can’t work it by hand in the same way. Instead, the mixer vigorously beats the ingredients together, which helps to hydrate the flours and create a strong, stable structure with the help of the xanthan gum.
You will mix the dough for several minutes, first combining the dry and wet ingredients, then adding the softened butter one piece at a time. This gradual addition helps the fat incorporate evenly, resulting in that signature tender crumb. The final dough will be very soft and sticky, which is exactly what you want.

A Foolproof Gluten Free Brioche Recipe
Once your dough is mixed, it’s time for the first rise. You’ll cover the bowl and let it rest in a warm, draft-free spot until it has visibly increased in size. This can take anywhere from 1 to 2 hours, depending on the temperature of your kitchen. This resting period allows the yeast to get to work, producing the carbon dioxide that will make the bread light and airy.
After the first rise, the dough needs to be chilled. This step is essential for a gluten free brioche recipe, as it solidifies the butter and makes the sticky dough much easier to handle and shape. Place the covered bowl in the refrigerator for at least a few hours or, even better, overnight.
Shaping the Sticky Dough
Working with chilled dough makes a world of difference. Lightly flour your work surface and hands with a bit of gluten-free flour to prevent sticking. Gently deflate the dough and turn it out onto the surface. You can shape it into a simple loaf and place it in a greased loaf pan, or you can get more traditional by dividing it into smaller balls.
For the classic “brioche à tête” look, you would form several small balls of dough and arrange them snugly in the pan. This creates a beautiful pull-apart loaf. Don’t overwork the dough during this stage; handle it just enough to get it into the desired shape.
Proofing for a Perfect Rise
After shaping, the dough needs its second and final rise, known as proofing. Cover the pan loosely with plastic wrap and let it sit in a warm place for about 30 to 60 minutes, or until the dough has risen to just above the rim of the pan. This final rise gives the yeast one last chance to create air pockets, which translates to a fluffy final product. If you live at a high altitude, you may need to adjust your proofing and baking times; this guide to high-altitude baking is a helpful resource.
Baking and Storing Your Gluten Free Brioche
The final stage is baking your beautiful loaf. A hot oven transforms the soft dough into a golden-brown masterpiece. The high initial temperature helps the bread rise quickly in the oven, a phenomenon known as “oven spring.” This gives your gluten free brioche its impressive height.
Before it goes into the oven, a simple egg wash—a beaten egg brushed over the top of the dough—will give the crust a beautiful, shiny, golden-brown finish. This step is optional but highly recommended for that classic bakery look.
Achieving a Golden-Brown Crust
Preheat your oven to 375°F (190°C). Brush the top of your proofed dough with the egg wash. You can also sprinkle some pearl sugar on top for a sweet, crunchy finish if you like. Bake the loaf for about 30-40 minutes. About halfway through baking, if you notice the top is browning too quickly, you can loosely cover it with aluminum foil.
The brioche is done when it’s a deep golden brown and an instant-read thermometer inserted into the center reads 190-200°F (88-93°C). The internal temperature is the most reliable way to know if your bread is fully cooked.
How to Keep Your Brioche Fresh
Let the gluten free brioche cool in the pan for about 10 minutes before turning it out onto a wire rack to cool completely. It’s tempting to slice into it right away, but allowing it to cool is important, as it helps the internal structure set.
Like most gluten-free baked goods, this brioche is best enjoyed on the day it’s made. However, you can store it in an airtight container at room temperature for up to 2-3 days. If you find it’s starting to get a little dry, a few seconds in the microwave will bring back its softness. The slices also make amazing French toast!
My Favorite Gluten Free Brioche Recipe
This recipe is the culmination of so many attempts to get that perfect, soft texture. I’m confident it will become a favorite in your home, too.
Easy recipe for Gluten Free Brioche in 5 Steps
Ingredients
- ½ cup Warm Milk dairy or non-dairy, 105-115°F (40-46°C)
- 2 ¼ tsp Active Dry Yeast 1 packet
- ¼ cup Granulated Sugar plus 1 tsp for yeast activation
- 2 ½ cups Gluten-Free All-Purpose Flour Blend with xanthan gum (approx. 300g)
- ½ tsp Salt
- 2 Large Eggs for the dough
- ½ cup Unsalted Butter softened, 1 stick (113g)
- 1 Large Egg for egg wash
- 1 tbsp Water for egg wash
Instructions
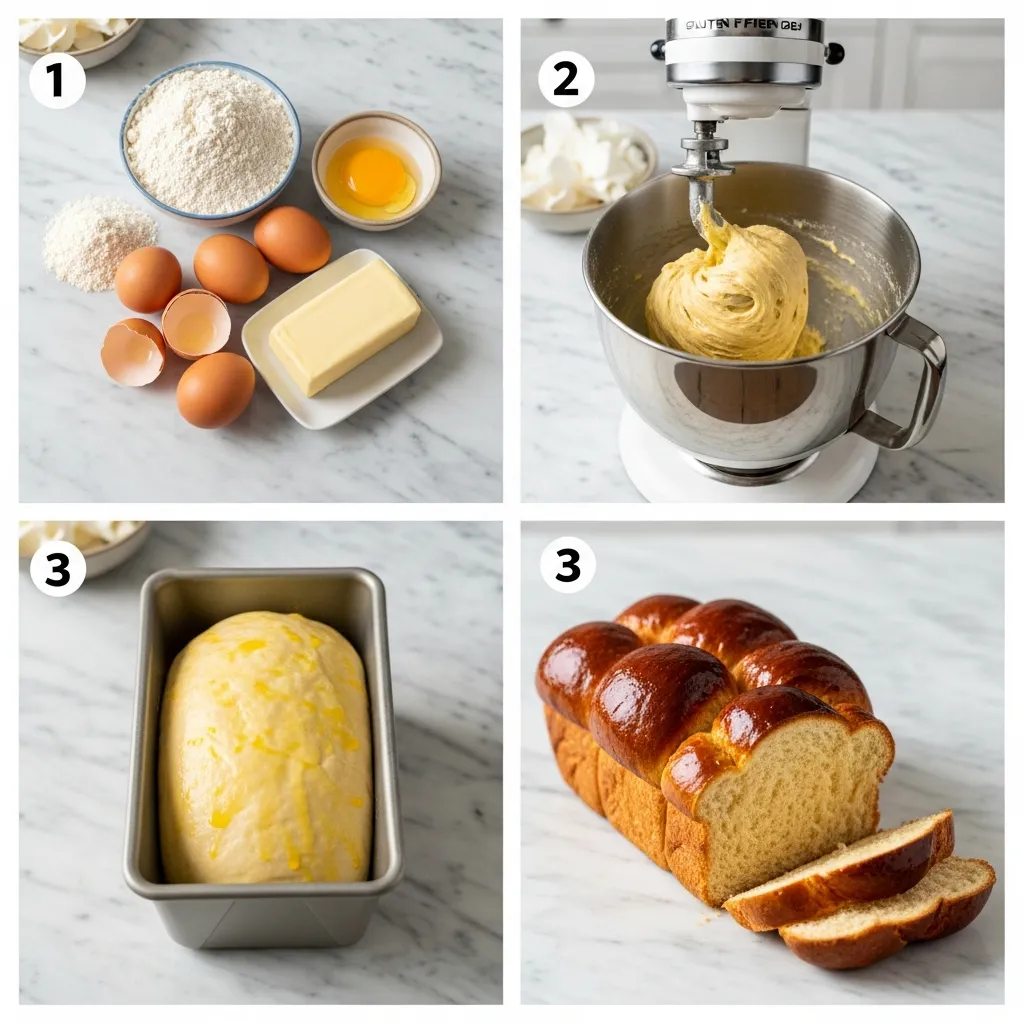
- Step 1: Activate Yeast. In a small bowl, combine the warm milk (105-115°F / 40-46°C), 1 teaspoon of granulated sugar, and active dry yeast. Stir gently and let sit for 5-10 minutes until the mixture is foamy, indicating the yeast is active.
- Step 2: Prepare Dry & Wet Ingredients. In the bowl of a stand mixer, whisk together the gluten-free all-purpose flour blend, the remaining 1/4 cup granulated sugar, and salt. In a separate bowl, lightly beat the 2 large eggs for the dough, then add them to the activated yeast mixture.
- Step 3: Combine and Knead. Pour the wet ingredients into the dry ingredients in the stand mixer. Using the paddle attachment, mix on low speed until just combined. Gradually add the softened butter, one tablespoon at a time, mixing thoroughly after each addition until fully incorporated. Increase the speed to medium and beat for 5-7 minutes until the dough is smooth, elastic, and pulls away from the sides of the bowl. Gluten-free brioche dough will be softer than traditional dough.
- Step 4: First Rise & Shaping. Lightly grease a large bowl. Transfer the dough to the bowl, cover with plastic wrap, and let rise in a warm place for 1.5 to 2 hours, or until doubled in size. Gently punch down the dough to release air. Shape the dough into a loaf and place it into a greased 9×5-inch loaf pan. Cover lightly with plastic wrap and let rise again for 45-60 minutes, or until nearly doubled in size.
- Step 5: Bake the Brioche. Preheat your oven to 375°F (190°C). In a small bowl, whisk the remaining large egg with 1 tablespoon of water to create an egg wash. Gently brush the top of the risen brioche loaf with the egg wash. Bake for 30-35 minutes, or until the top is golden brown and a thermometer inserted into the center of the loaf reads 200-205°F (93-96°C). If the top begins to brown too quickly, loosely tent with aluminum foil. Let the brioche cool in the pan for 10 minutes before transferring it to a wire rack to cool completely.
Notes
Frequently Asked Questions
What makes brioche different from regular bread?
Brioche stands apart from regular bread due to its enriched dough. It contains a high proportion of eggs and butter, which gives it a very rich flavor and a soft, tender, and cake-like crumb. Regular bread, in contrast, is typically a lean dough made with just flour, water, yeast, and salt.
Can I make this brioche dairy-free?
Yes, you can make a dairy-free version. To do so, substitute the whole milk with a full-fat, unsweetened plant-based milk like almond or oat milk. For the butter, use a high-quality, solid dairy-free butter substitute that comes in stick form. The results will be very close to the original.
Why is my gluten-free brioche dense?
A dense gluten-free brioche can result from a few issues. First, your yeast may not have been fully active. Always check for foam after proofing it. Second, the dough may not have been allowed to rise long enough in a warm spot. Finally, using a heavy or incorrect gluten-free flour blend can weigh the bread down. Stick to a light, cup-for-cup blend with xanthan gum for the best results.
What is the best way to eat brioche?
Brioche is wonderfully versatile. You can enjoy a fresh slice on its own with a bit of butter or jam. It’s also fantastic for making French toast, as its sturdy but soft crumb soaks up the egg mixture beautifully. Additionally, it makes an amazing base for bread pudding or even as a bun for savory sandwiches like pulled pork.
Conclusion
Baking a truly delicious gluten free brioche at home is not just possible; it’s a deeply satisfying project. This recipe breaks down the process into simple, manageable steps that lead to a soft, buttery loaf every time. The aroma that fills your kitchen as it bakes is pure comfort, and the taste is even better. I hope you and your family love this bread as much as I do. It’s proof that a gluten-free life can still be full of wonderful, nostalgic flavors.