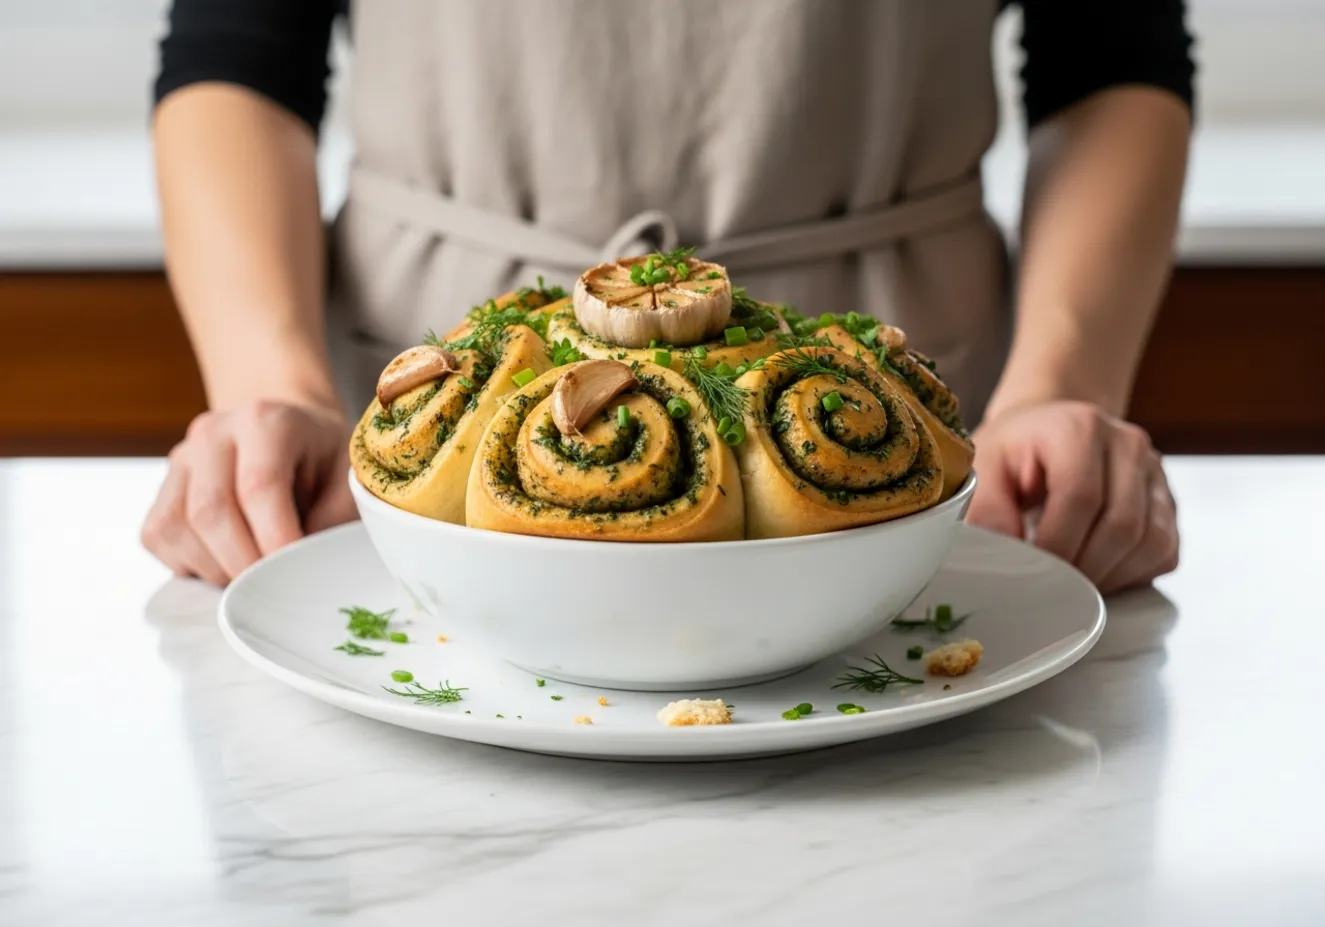
There’s a certain magic in the smell of bread baking. For me, it instantly brings back memories of Sundays at my grandmother’s house. The whole family would gather, and the air would be thick with the comforting aroma of yeast and melting butter. She had a special knack for making savory breads, and her secret was always a generous amount of fresh herbs and garlic. This recipe for Herb & Garlic Swirl Rolls is my tribute to her. It’s a simple, yet incredibly flavorful bread that turns any meal into a special occasion. I’ve refined her method over the years to create the softest, most pillowy rolls imaginable.
These Herb & Garlic Swirl Rolls are not just a side dish; they are the star of the show. Imagine tearing one open, steam escaping to reveal a beautiful swirl of green herbs and fragrant garlic. They are perfect for soaking up soup, pairing with a hearty pasta, or serving alongside a main course like some juicy air fryer Greek lamb chops. Making these Herb & Garlic Swirl Rolls from scratch is a rewarding process that fills your home with the most incredible scent.
Why These Herb & Garlic Swirl Rolls Are a Must-Bake
There is nothing quite like homemade bread, and these Herb & Garlic Swirl Rolls prove that you don’t need to be a professional baker to achieve amazing results. The recipe starts with a simple, forgiving dough that is a joy to work with. Furthermore, the combination of fresh herbs and pungent garlic creates a flavor profile that is both classic and exciting. These rolls are soft, fluffy, and completely irresistible right out of the oven.
The true beauty of this recipe lies in its versatility. You can serve these rolls with breakfast, lunch, or dinner. They make a fantastic addition to a holiday feast or a simple weeknight meal. In fact, they are so good, you might find yourself baking a batch just to enjoy on their own with a little bit of extra butter.
The Foundation: A Soft and Simple Dough
The secret to any great roll is the dough. For these Herb & Garlic Swirl Rolls, we use an enriched dough, which means it includes ingredients like milk, butter, and a touch of sugar. These components are what give the rolls their signature softness and tender crumb. The sugar doesn’t make the bread sweet; instead, it feeds the yeast and helps create a beautiful golden-brown crust during baking.
Working with yeast can seem intimidating, but this recipe makes it straightforward. We use active dry yeast, which you activate in warm milk. This simple step awakens the yeast, making sure your dough rises properly. You can mix the dough by hand or with a stand mixer, so it’s accessible for every type of home cook. Just remember to knead it until it’s smooth and elastic. This develops the gluten, which is the structure that traps air and makes the rolls light and fluffy.
Key Ingredients for Success
Beyond the basic dough components, a few key ingredients make these rolls special. First, using good quality all-purpose flour provides the right balance of protein for a soft but structured roll. Second, real butter is essential. It adds richness and flavor that you simply cannot get from substitutes. For the filling, fresh garlic and a mix of fresh herbs are non-negotiable for the best taste. While you can use dried herbs in a pinch, fresh parsley, chives, and rosemary offer a vibrant flavor that really stands out.
Crafting the Perfect Herby Garlic Filling
The swirl inside these rolls is where all the magic happens. A flavorful filling transforms a simple bread dough into something truly special. For our Herb & Garlic Swirl Rolls, the filling is a simple yet potent mixture of melted butter, minced garlic, and a generous amount of finely chopped fresh herbs. This combination creates a savory, aromatic paste that gets rolled into the dough.
As the rolls bake, the butter melts into the bread, the garlic softens and becomes sweet, and the herbs release their fragrant oils. The result is a beautiful spiral of flavor running through each and every roll. Don’t be shy with the filling; you want to spread it all the way to the edges to get that herb and garlic goodness in every single bite.
Choosing Your Herbs
The choice of herbs can completely change the character of your rolls. A classic combination that works wonderfully is parsley, chives, and a little bit of rosemary. Parsley provides a fresh, clean taste, chives add a mild oniony note, and rosemary contributes a lovely piney aroma. Thyme is another excellent addition.
You can also customize the herb blend based on what you have on hand or what you’re serving the rolls with. For example, if you’re making an Italian-inspired meal, try a mix of fresh basil and oregano. For a more rustic flavor, sage and thyme are a fantastic pairing. The key is to chop the herbs finely so they distribute evenly and don’t create large, tough bits in the finished rolls.
The Importance of Fresh Garlic
While garlic powder has its place, this recipe truly shines with the use of fresh garlic. Freshly minced garlic provides a pungent, complex flavor that mellows and sweetens as it bakes. You want to mince it as finely as possible so it blends seamlessly into the butter and herbs. A garlic press is a great tool for this, but a sharp knife and some patience work just as well. The amount of garlic is up to you, but I find that four to five cloves provide a robust flavor that is present but not overpowering.
Serving and Customizing Your Savory Swirl Rolls
These rolls are incredibly versatile and can be adapted for any occasion. They are, of course, a fantastic side dish. Imagine a basket of these warm Savory Swirl Rolls on your dinner table, ready to accompany a hearty stew, a creamy soup, or a roasted chicken. Their soft texture is perfect for soaking up sauces and gravies, and the savory filling complements a wide variety of main courses.
Beyond being a side, these Savory Swirl Rolls can also be the base for other creations. You can use the same dough and filling technique to make a larger loaf of swirl bread, which is perfect for slicing and making sandwiches. You can also add a cup of shredded sharp cheddar or Parmesan cheese to the filling for an extra layer of savory goodness. These cheesy garlic herb rolls are a guaranteed crowd-pleaser. Once you master the basic recipe, you will find many ways to make it your own. And after a satisfying savory meal, you might be looking for something sweet. You can find many wonderful dessert and treat ideas to finish your meal perfectly.
Pairing Suggestions
To make a complete and satisfying meal, think about what flavors pair well with garlic and herbs. These rolls are a natural match for Italian dishes like lasagna or spaghetti and meatballs. They are also wonderful with grilled meats and vegetables. Try serving them with a simple green salad dressed with a vinaigrette for a light lunch. For a truly comforting meal, pair them with a bowl of tomato soup. The possibilities are nearly endless.
Creative Variations
Don’t be afraid to experiment with the filling. For a bit of spice, add a pinch of red pepper flakes to the butter mixture. For a deeper, umami-rich flavor, mix in some finely chopped sun-dried tomatoes or olives. You can even create different types of Savory Swirl Rolls by changing the main flavor profile. A pesto swirl roll or a caramelized onion and Gruyère swirl roll would be equally delicious variations on this fundamental technique.
Baking Tips for the Fluffiest Garlic Herb Rolls
Achieving that perfectly soft, fluffy texture in your garlic herb rolls comes down to a few important steps. First, pay close attention to the proofing process. Proofing is the time the dough is left to rest and rise. The first rise, after kneading, is crucial for developing flavor and texture. The second rise, after the rolls are shaped, gives them their light, airy structure. Make sure you let the rolls rise in a warm, draft-free spot until they are visibly puffy and have nearly doubled in size.
Another key tip is to not over-bake the rolls. You want to bake them until they are golden brown on top, but still soft. An over-baked roll will be dry and hard. A good way to check for doneness is to use an instant-read thermometer. The internal temperature of the rolls should be between 190°F and 200°F. If you don’t have a thermometer, you can gently tap the top of a roll; it should sound hollow.
The Art of the Roll
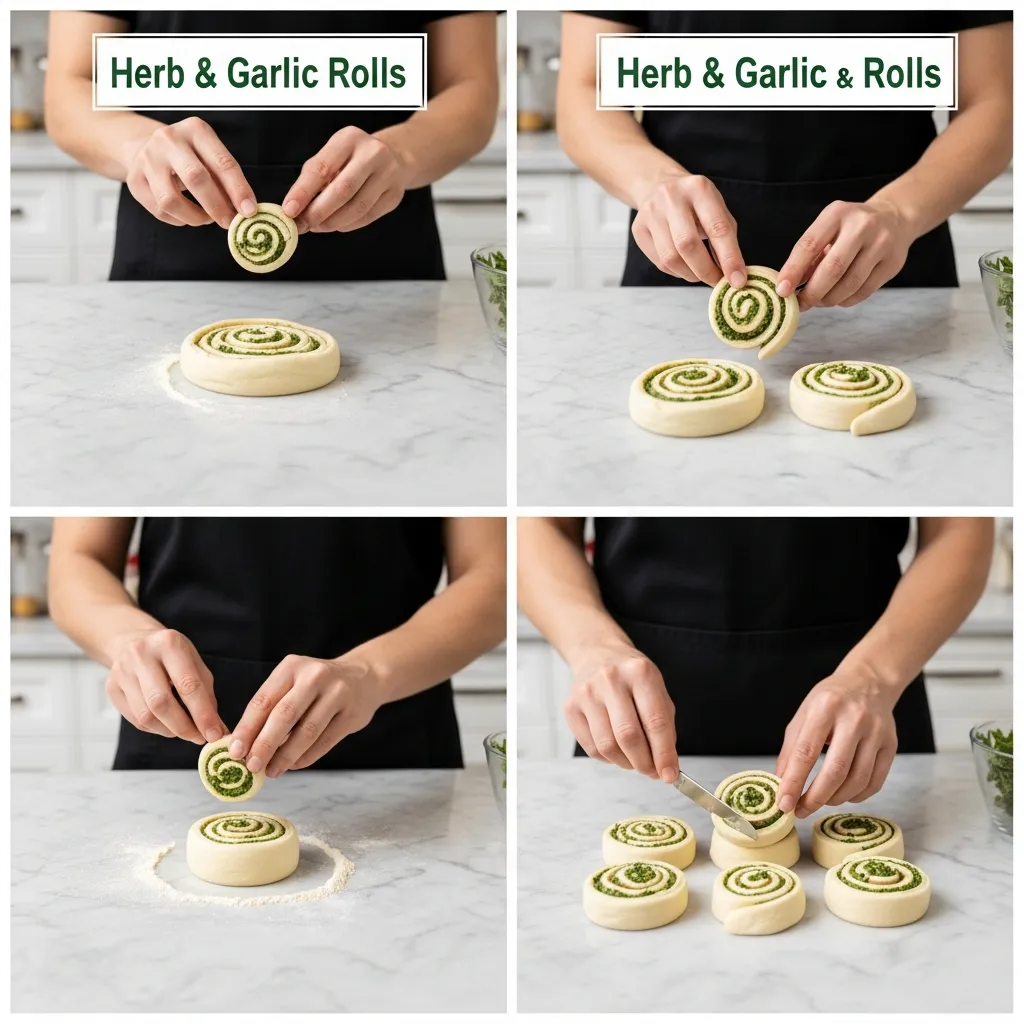
The technique for rolling and cutting the dough is what creates the beautiful swirl. After the first rise, you will roll the dough out into a large rectangle. Try to keep the thickness as even as possible. After spreading the filling over the dough, roll it up tightly from one of the long edges into a log. A tight roll is important for creating a neat, defined swirl.
Once you have your log, you need to slice it into individual rolls. Using a sharp knife is important, but it can sometimes squash the dough. A great trick is to use a piece of unflavored dental floss or thread. Slide it under the log, cross the ends over the top, and pull. This will give you a clean, perfect cut every time without compressing the soft dough.
Achieving a Golden-Brown Finish
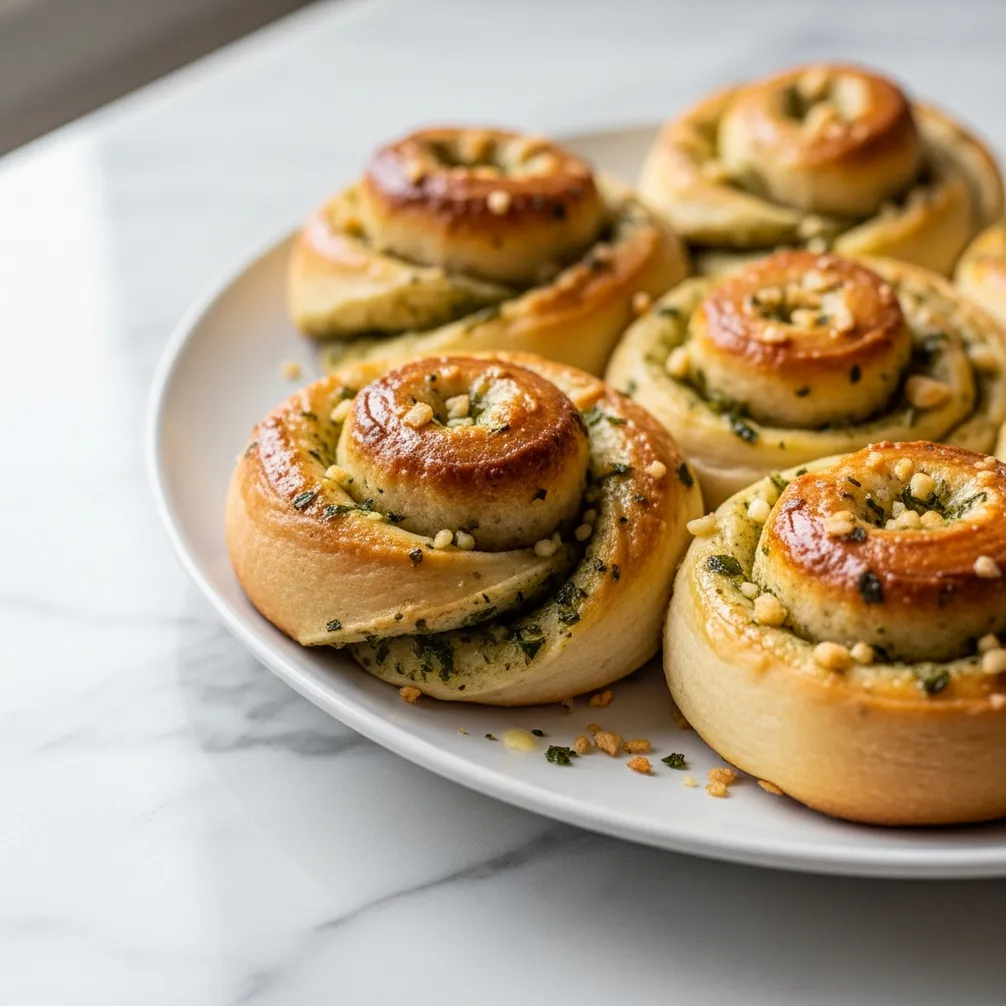
For that beautiful, shiny, golden-brown top, an egg wash is the secret. An egg wash is simply a whole egg or an egg yolk beaten with a tablespoon of water or milk. Just before the rolls go into the oven, brush this mixture lightly over the tops. As they bake, the egg wash will give them a gorgeous color and a slight sheen. For an extra touch of flavor and texture, you can sprinkle a little flaky sea salt or some extra chopped herbs on top after applying the egg wash.
How to Make Herb & Garlic Swirl Rolls
Get ready to fill your kitchen with the amazing aroma of freshly baked bread. This simple recipe will guide you to making the softest, most flavorful rolls.
Secret to the best 12 Herb & Garlic Swirl Rolls
Ingredients
- 1 cup warm milk (105-115°F / 40-46°C)
- 2.25 tsp active dry yeast (1 standard packet)
- 2 tbsp granulated sugar
- 3 cups all-purpose flour plus more for dusting
- 1 tsp salt
- 4 tbsp unsalted butter melted, for dough
- 1 large egg
- 6 tbsp unsalted butter softened, for filling
- 4 cloves garlic minced
- 2 tbsp fresh parsley finely chopped
- 1 tbsp fresh chives finely chopped
- 1 tbsp fresh oregano finely chopped
- ½ tsp dried thyme or 1 tsp fresh
- ¼ cup grated Parmesan cheese
- ¼ tsp black pepper
- 2 tbsp unsalted butter melted, for brushing
- ½ tsp garlic powder for brushing
Instructions
- Activate the Yeast: In a large mixing bowl, combine the warm milk, granulated sugar, and active dry yeast. Stir gently and let it sit for 5-10 minutes until foamy. This indicates the yeast is active.
- Prepare the Dough: To the foamy yeast mixture, add the 3 cups of all-purpose flour, 1 teaspoon of salt, 4 tablespoons of melted butter, and the large egg. Mix with a spoon or a stand mixer with a dough hook attachment until a shaggy dough forms. If using a stand mixer, knead on medium-low speed for 5-7 minutes. If kneading by hand, turn the dough out onto a lightly floured surface and knead for 8-10 minutes until the dough is smooth and elastic. It should spring back when lightly poked.
- First Rise: Lightly grease a clean large bowl with a little oil. Place the dough in the bowl, turning once to coat. Cover the bowl with plastic wrap or a clean kitchen towel. Let the dough rise in a warm, draft-free place for 1 to 1.5 hours, or until doubled in size.
- Prepare the Herb & Garlic Filling: While the dough is rising, prepare the filling. In a small bowl, combine the 6 tablespoons of softened unsalted butter, minced garlic, finely chopped fresh parsley, fresh chives, fresh oregano, dried thyme, grated Parmesan cheese, and black pepper. Mix until well combined and creamy.
- Shape the Rolls: Once the dough has doubled, gently punch it down to release the air. Turn the dough out onto a lightly floured surface and roll it into a large rectangle, approximately 18×12 inches (45×30 cm).
- Spread the Filling: Evenly spread the herb and garlic butter filling over the entire surface of the dough rectangle, leaving a small border (about 1/2 inch) on one of the long edges.
- Roll and Slice: Starting from the long edge opposite the border, tightly roll the dough into a log. Pinch the seam gently to seal. Using a sharp knife or unflavored dental floss, cut the log into 12 equal slices (about 1.5 inches thick each).
- Second Rise: Arrange the sliced rolls cut-side up on a baking sheet lined with parchment paper, leaving about 1 inch of space between each roll. Cover loosely with plastic wrap or a clean kitchen towel and let them rise in a warm place for another 30-45 minutes, or until visibly puffy.
- Bake the Rolls: Preheat your oven to 375°F (190°C) during the last 15 minutes of the second rise. Once the oven is preheated, remove the cover from the rolls and bake for 20-25 minutes, or until the tops are golden brown and the rolls are cooked through.
- Garlic Butter Glaze: While the rolls are baking, melt the remaining 2 tablespoons of unsalted butter and stir in the 1/2 teaspoon of garlic powder. Once the rolls are out of the oven, immediately brush the tops with this garlic butter glaze. Optionally, sprinkle with a little extra fresh parsley.
Notes
Frequently Asked Questions
Can I make the dough ahead of time?
Yes, you can. After kneading the dough, place it in a greased bowl, cover it, and let it complete its first rise in the refrigerator for up to 24 hours. This slow, cold fermentation actually develops a more complex flavor. When you are ready to bake, let the dough sit at room temperature for about 30-60 minutes to take the chill off before proceeding with shaping and the second rise.
What herbs work best in these swirl rolls?
A combination of fresh, soft herbs works best. Parsley, chives, dill, and basil are excellent choices. You can also use hardier herbs like rosemary or thyme, but be sure to chop them very finely. A mix of two or three different herbs usually provides the most balanced and interesting flavor.
How do I store leftover Herb & Garlic Swirl Rolls?
Store any leftover rolls in an airtight container or a zip-top bag at room temperature for up to 3 days. To restore their softness, you can warm them in the microwave for 15-20 seconds or wrap them in foil and heat them in a 350°F oven for about 5-7 minutes. They also freeze very well for up to 3 months.
Can I use a stand mixer for this recipe?
Absolutely. A stand mixer with a dough hook attachment makes kneading the dough very easy. Simply combine the ingredients in the mixer bowl and let the machine do the work for about 5-7 minutes on medium-low speed, or until the dough is smooth and elastic. You can, of course, still make this recipe with great success by kneading by hand on a lightly floured surface.
Conclusion
Baking these Herb & Garlic Swirl Rolls is more than just following a recipe; it’s about creating moments of warmth and connection. The process is simple, the ingredients are straightforward, and the result is a batch of incredibly soft, flavorful rolls that will impress everyone. Whether you are a seasoned baker or just starting, I encourage you to try this recipe. The delightful aroma and the taste of a warm, buttery roll straight from your own oven are truly one of life’s simple pleasures.